

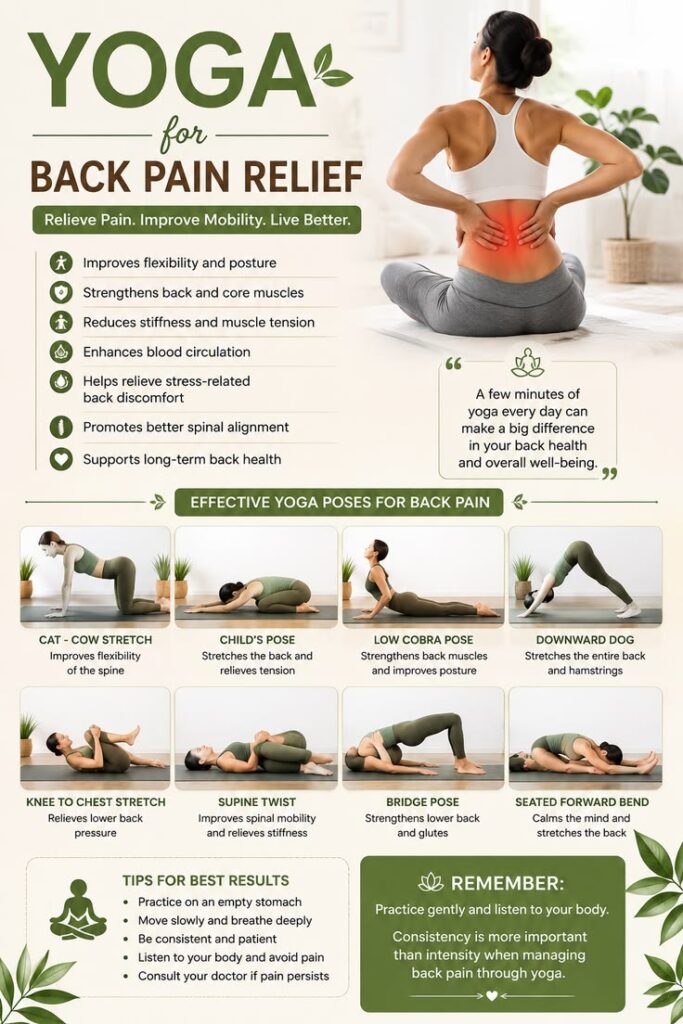
10 Best Yoga Poses for Back Pain
(Beginner’s Guide That Actually Works)
Quick Answer: The best yoga poses for back pain relief include: Cat-Cow, Child’s Pose, Bridge Pose, Cobra Pose, and Sphinx Pose. These gentle movements strengthen the muscles that support your spine, improve flexibility, and reduce tension — often within just a few weeks of consistent practice.
Table of Contents
1. What Is Yoga for Back Pain?
2. Why Back Pain Happens?
3. Proven Benefits of Yoga for Back Pain Relief (benefits)
4. Who Can Benefit from Yoga for Back Pain?
5. Before You Start: Safety Tips You Must Know
6. 10 Best Yoga Poses for Back Pain Relief
- Cat-Cow Pose
- Downward-Facing Dog
- Extended Triangle Pose
- Sphinx Pose
- Cobra Pose
- Locust Pose
- Bridge Pose
- Half Lord of the Fishes Pose
- Two-Knee Spinal Twist
- Child’s Pose
7. Yoga Poses to Avoid with Back Pain
8. Common Mistakes Beginners Make
9. Best Time to Practice Yoga for Back Pain
10. What Science Says About Yoga and Back Pain?
11. When to See a Doctor?
12. Frequently Asked Questions?
13. Final Thoughts
What Is Yoga for Back Pain?
Back pain affects nearly 80% of people at some point in their lives. It can hit you while sitting at your desk, sleeping, or even picking up a coffee mug. The frustrating part? Most standard treatments only mask the pain — they don’t fix what’s causing it.
Yoga for back pain is different.
It combines mindful movement, deep breathing, and targeted stretching to fix the root problem: tight muscles, poor posture, and a weak core. Instead of numbing the pain temporarily, yoga builds the strength and flexibility your spine needs to stay healthy long term.
In this guide, you’ll learn:
1. Why your back hurts (and what yoga does to fix it)
2. The 10 best yoga poses for back pain — with step-by-step instructions
3. Safety tips every beginner needs to know
4. Which poses to (avoid) if you have a back injury
5. What research says about yoga and chronic back pain
Whether you’re dealing with a nagging lower back ache or chronic stiffness, this beginner-friendly guide will help you move better, feel better, and protect your spine for years to come.
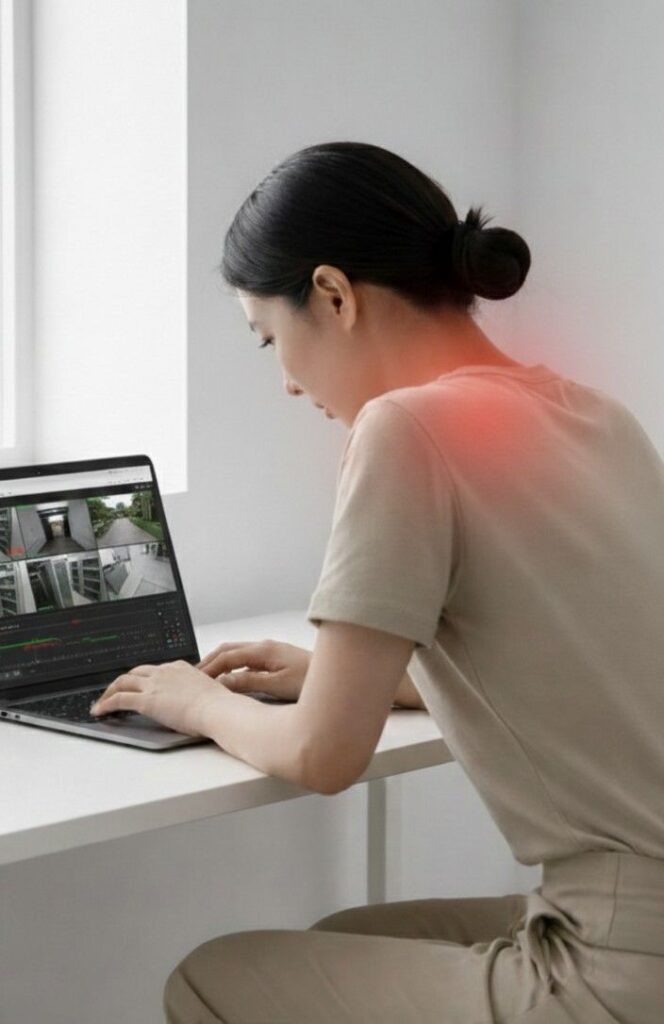
Why Back Pain Happens
Before jumping into poses, it helps to understand why your back hurts in the first place.
The Most Common Causes of Back Pain
1. Prolonged sitting:
Weakens glutes, tightens hip flexors, and puts constant pressure on spinal discs
2. Poor posture:
Rounded shoulders and forward head position strain the muscles along your spine
3. Weak core muscles:
Without a strong core, your spine carries all the load
4. Tight hamstrings:
Short, stiff hamstrings pull on the pelvis and increase lower back stress
5. Muscle imbalances:
When some muscles are tight and others are weak, the spine gets pulled out of alignment
6. Stress and tension:
Chronic stress causes muscles to stay contracted, especially in the neck, shoulders, and lower back
How Yoga Addresses These Causes Directly
Yoga works on all of these issues at once. Each session:
– Lengthens tight muscles (hamstrings, hip flexors, chest)
– Strengthens weak muscles (core, glutes, spinal extensors)
– Corrects posture and spinal alignment
– Activates the nervous system’s relaxation response to reduce stress-driven tension
– Improves body awareness so you carry yourself better throughout the day
Key Insight:
Yoga doesn’t just stretch your back. It retrains how your whole body moves — and that’s why it works when other treatments fail.
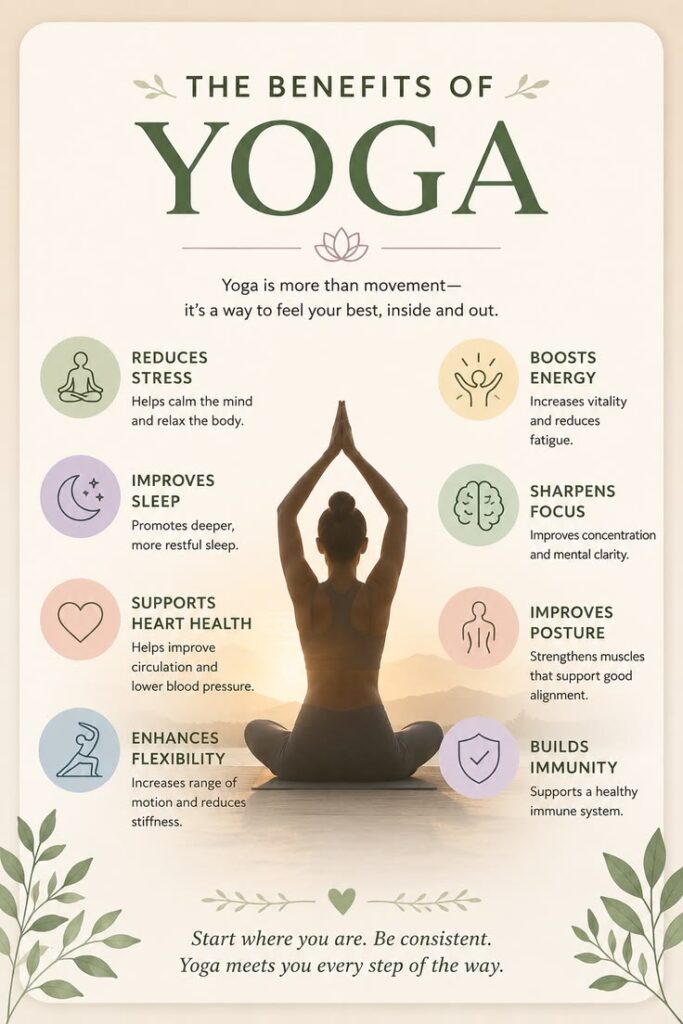
Proven Benefits of Yoga for Back Pain Relief
Regular yoga practice does more than just reduce pain. Here’s what you can realistically expect:
Physical Benefits:
Benefit What Changes
1. Stronger back muscles:
Spinal extensors, glutes, and core become more supportive.
2. Better flexibility:
Tight hamstrings, hips, and shoulders gradually release, improving movement.
3. Improved posture:
The spine maintains a healthier natural curve, reducing strain on the back.
4. Less muscle tension:
Chronic tightness in the back and neck gradually decreases.
5. Better spinal mobility:
Bending, twisting, and reaching become easier and more comfortable.
6. Reduced inflammation
Gentle movement improves circulation and supports the body’s natural healing.
Mental and Emotional Benefits
Less stress:
Breathing exercises calm the nervous system
Better sleep:
Relaxed muscles and a calmer mind support deeper rest
More confidence:
Moving without pain changes how you feel about your body
Greater body awareness:
You catch and correct poor habits before they cause pain
Who Can Benefit from Yoga for Back Pain?
Yoga for back pain works for a wide range of people, including:
1. Office workers:
who sit for 6–8 hours a day
2. Older adults:
dealing with stiffness and reduced mobility
3. Athletes:
recovering from muscle tightness or minor back strain
4. New moms:
experiencing postpartum back pain
5. People with sedentary lifestyles:
looking for a gentle starting point
6. Anyone with chronic lower back pain
who wants a natural, movement-based approach
Important:
If you have a herniated disc, spinal stenosis, recent back surgery, severe osteoporosis, or nerve pain that radiates down your legs, consult your doctor before starting any yoga practice.
Before You Start: Safety Tips You Must Know
Starting yoga with back pain requires more caution than a typical workout. Follow these rules every time you practice.
1. Know Your Current Condition:
Be honest about where you’re starting. A tight lower back from desk work is very different from a herniated disc. If you’re unsure about your condition, see a healthcare provider first.
2. Always Warm Up First:
Never jump straight into deep stretches. Spend 3–5 minutes doing gentle movements like walking in place, slow neck rolls, or pelvic tilts to wake up your muscles.
3. Breathe Through Every Pose:
Shallow, held breath creates muscle tension. Breathe slowly and deeply through your nose, exhaling fully. Your breath is your best tool for releasing tight muscles.
4. Stretch Only to Comfort:
Mild tension during a stretch is normal. Sharp, shooting, or electric pain is not. If you feel intense discomfort, ease out of the pose immediately.
5. Move Slowly and Intentionally:
Rushing through poses increases your injury risk. Every transition should be controlled. Slow movement also helps you tune into what your body is actually feeling.
6. Use Props Without Shame:
Yoga blocks, straps, folded blankets, and bolsters are not signs of weakness — they’re tools for smart practice. Using props protects your body and helps you maintain correct alignment.
7. Consistency Beats Intensity:
Three 20-minute sessions per week will help you more than one exhausting hour-long class. Build the habit first, then build the intensity.
8. Stop and Seek Help If Symptoms Worsen:
If your pain increases after practicing or you develop new symptoms — especially numbness, tingling, or weakness in your legs — stop immediately and see a doctor.
10 Best Yoga Poses for Back Pain Relief
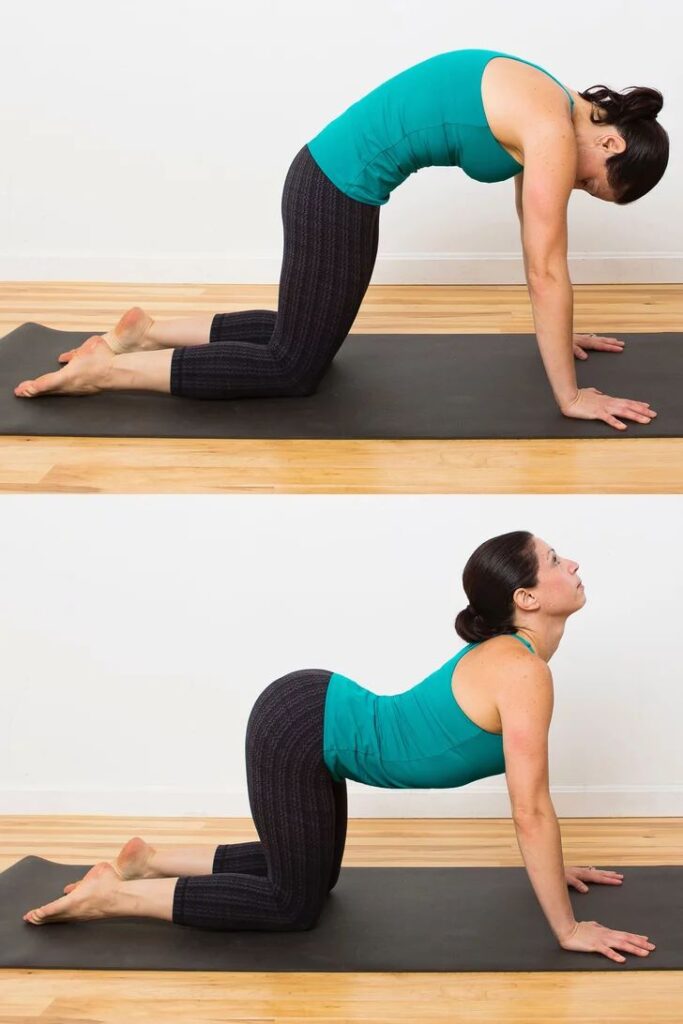
1. Cat-Cow Pose:
(Marjaryasana-Bitilasana)
Best for:
- Morning stiffness
- general spinal mobility
- warming up
The Cat-Cow is the single best starting pose for anyone with back pain. It gently moves the entire spine through two complementary directions — flexion and extension — which lubricates the joints, warms up the muscles, and gets blood flowing through the discs.
Benefits:
- Improves spinal flexibility and mobility
- Relieves tension in the neck, shoulders, and lower back
- Warms up the back before deeper poses
- Encourages mindful, rhythmic breathing
Muscles Worked:
Erector spinae, multifidus, rectus abdominis, obliques, trapezius, and neck muscles
How to Perform It:
1. Start on your hands and knees: wrists under shoulders, knees under hips
2. Cat: Exhale and round your spine upward toward the ceiling, tucking your chin to your chest and your tailbone under
3. Cow: Inhale and let your belly drop toward the floor, lifting your head and tailbone toward the ceiling
4. Flow slowly; between these two positions, matching each movement to your breath
5. Repeat 8–10 times
Common Mistakes:
1. Collapsing the lower back all at once (move one vertebra at a time)
2. Holding your breath instead of breathing with each movement
3. Moving too fast and losing the mind-body connection
Beginner Modification:
Place a folded blanket under your knees for extra cushioning. Keep the range of motion small at first — even a tiny movement is effective.
Safety Tip:
If wrist pain occurs, make fists and balance on your knuckles, or come down to your forearms.
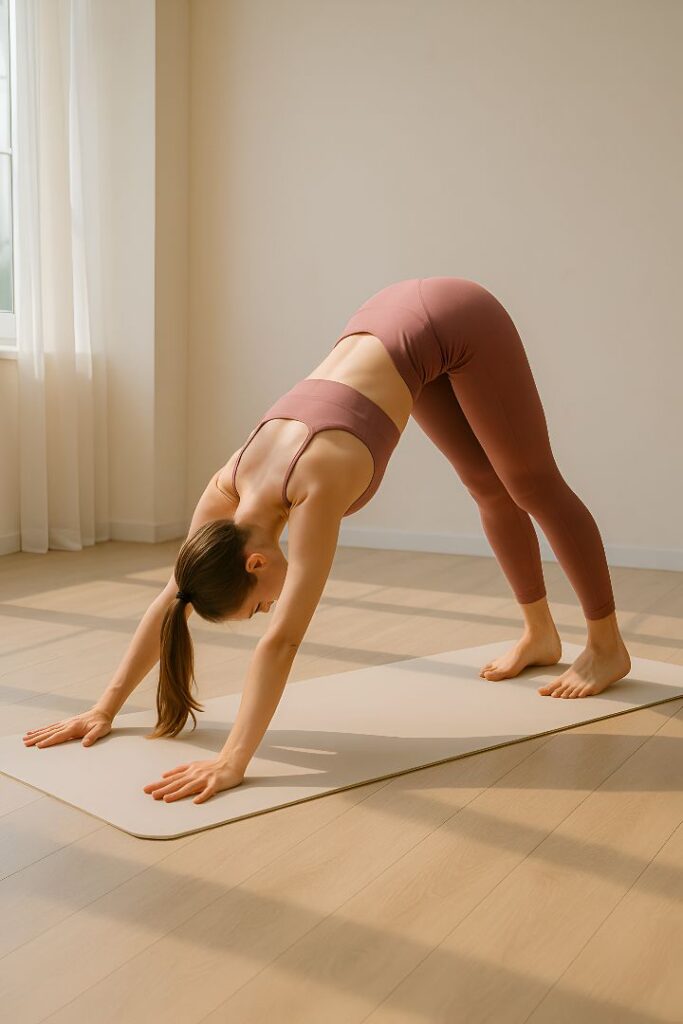
2. Downward-Facing Dog:
(Adho Mukha Svanasana)
Best for:
- Full-body decompression
- hamstring tightness
- overall spinal length
Downward Dog is one of the most recognized yoga poses in the world — and for good reason. It simultaneously stretches the entire back of the body while strengthening the upper body and core. This pose creates space between the vertebrae, which helps relieve compression caused by sitting.
Benefits:
- Lengthens the spine and decompresses the lower back
- Stretches tight hamstrings and calves that contribute to back pain
- Strengthens the shoulders, arms, and core
- Increases overall body circulation
Muscles Worked:
Hamstrings, calves, glutes, erector spinae, deltoids, triceps, and core stabilizers
How to Perform It:
1. Begin on hands and knees:in a tabletop position
2. Tuck your toes: under and press your hips up and back toward the ceiling
3. Straighten: your arms and try to press your heels toward the floor
4. Keep your head: between your upper arms, ears aligned with biceps
5. Hold for 5–8 deep breaths
Common Mistakes:
1. Rounding the upper back to get the heels down (prioritize a long, flat spine)
2. Locking the elbows (keep a soft micro-bend)
3. Letting the shoulders creep toward the ears
Beginner Modification:
Bend your knees generously. This allows your spine to lengthen fully even when your hamstrings are tight — and that’s the real point of the pose.
Safety Tip:
People with severe sciatica should approach this pose cautiously. If it increases leg pain or tingling, skip it and speak with a physical therapist.
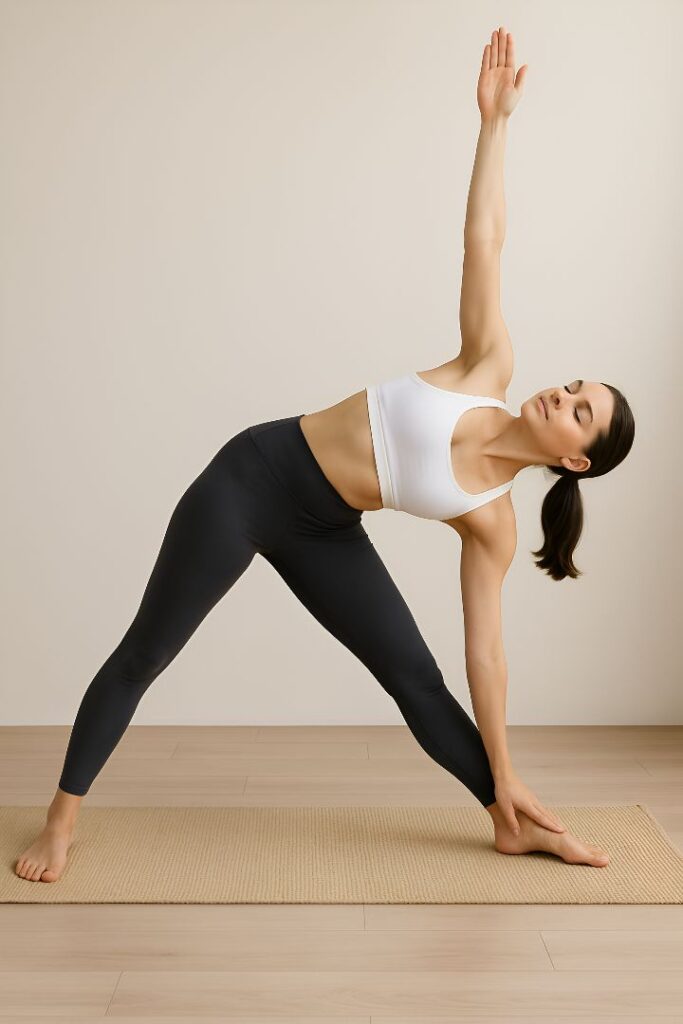
3. Extended Triangle Pose
(Utthita Trikonasana)
Best for:
- Posture
- hip tightness
- lateral back stretching
Triangle Pose looks simple but delivers a powerful stretch through the hips, hamstrings, and side body — areas that often become severely tight in people who sit for long hours. It also challenges your balance, which activates the small stabilizing muscles around your spine.
Benefits:
- Stretches the hips, hamstrings, groins, and side body
- Strengthens the legs and improves balance
- Opens the chest and shoulders to counteract hunching
- Improves overall postural awareness
Muscles Worked:
Hamstrings, hip flexors, obliques, IT band, quadriceps, and shoulder stabilizers
How to Perform It:
1. Stand with feet: about 3–4 feet apart
2. Turn your right: foot out 90 degrees and left foot slightly in
3. Extend your arms: parallel to the floor
4. Shift your right hip: back as you reach your right hand toward your right shin, ankle, or the floor
5. Extend your left arm: straight up toward the ceiling
6. Look up at: your left hand if comfortable, or keep your gaze forward
7. Hold for 5 breaths, then switch sides
Common Mistakes:
1. Collapsing the torso forward instead of keeping it open to the side
2. Reaching too low and losing spinal alignment
3. Locking the front knee
Beginner Modification:
Place a yoga block on the floor next to your chin. Rest your hand on the block instead of forcing it to the floor.
Safety Tip:
Avoid this pose if you have a recent hip injury or severe sciatica affecting the leg.
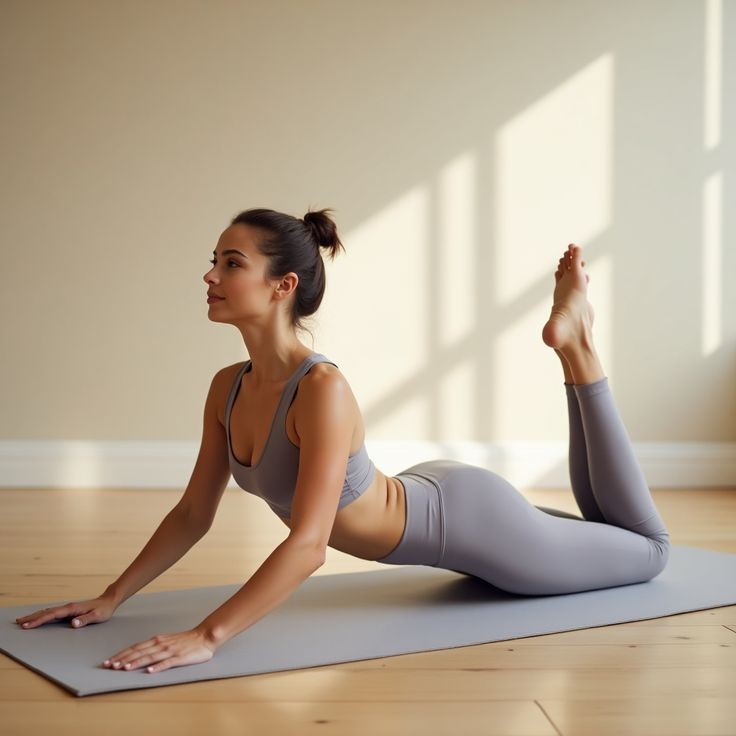
4. Sphinx Pose
(Salamba Bhujangasana)
Best for:
- Lower back strengthening
- gentle backbend
- beginners
Sphinx Pose is the gentlest backbend in yoga — and often the most therapeutic for lower back pain. Unlike Cobra (which uses arm strength), Sphinx relies on the passive support of your forearms, making it safe even for people with significant back sensitivity.
Benefits:
- Gently strengthens the spinal extensors without strain
- Opens the chest and counteracts the effects of prolonged sitting
- Encourages healthy lumbar (lower back) curve
- Reduces stiffness after long periods of inactivity
Muscles Worked:
Erector spinae, multifidus, glutes, pectoral muscles, and abdominals
How to Perform It:
1. Lie face down: on your mat with legs extended behind you
2. Place your forearms: on the mat, elbows directly below your shoulders
3. Press your forearms: and pubic bone gently into the floor
4. Lift your chest and head: gazing forward or slightly upward
5. Relax your glutes and lower back: let the muscles do the work passively
6. Hold for 30 seconds to 2 minutes, breathing slowly
Common Mistakes:
1. Tensing the neck and shoulders instead of keeping them relaxed
2. Squeezing the glutes (this compresses the lumbar spine)
3. Flaring the elbows wide
Beginner Modification:
Place a folded blanket under your hips to reduce lower back compression if you feel pressure.
Safety Tip:
People with lumbar spinal stenosis should check with their doctor before doing any backbend. Stenosis can be aggravated by spinal extension.
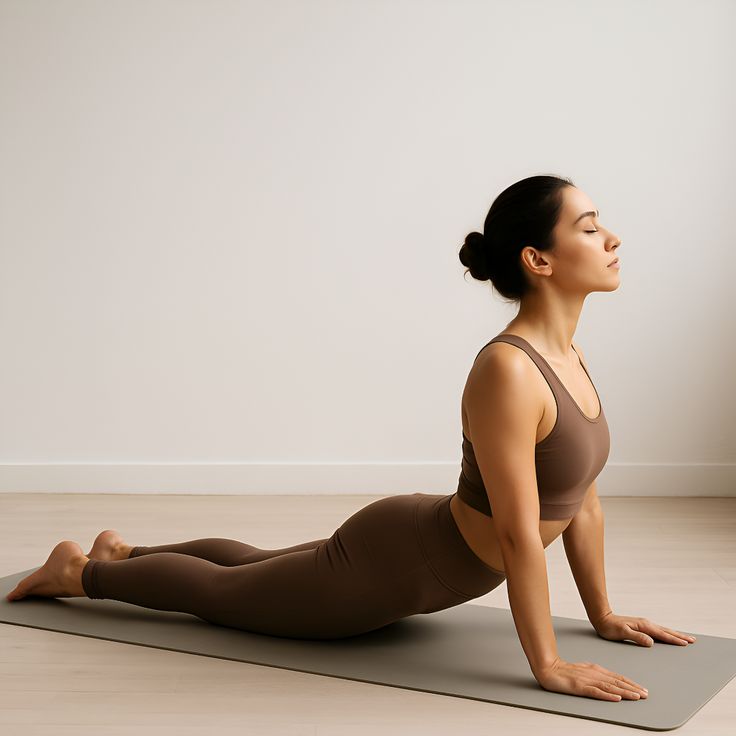
5. Cobra Pose:
(Bhujangasana)
Best for:
- Spinal extension
- counteracting desk posture
- core activation
Cobra Pose builds on Sphinx by adding more range of motion and greater spinal muscle engagement. It’s one of the most effective poses for counteracting the “desk slouch” that causes so much back pain in modern life.
Benefits:
- Strengthens the spinal erectors and back muscles
- Stretches the chest, abdomen, and hip flexors
- Reduces the compressive effects of prolonged sitting
- Improves spinal extension and flexibility
Muscles Worked:
Erector spinae, multifidus, glutes, pectoral minor, abdominals, and hip flexors (stretch)
How to Perform It:
1. Lie: face down, hands under your shoulders, elbows close to your body
2. Press the: tops of your feet into the mat
3. Inhale and use your back muscles: to lift your chest off the floor
4. Your arms support: but do not push — think of keeping a small bend in the elbows
5. Keep your hips: on the mat and gaze forward
6. Hold for 15–30 seconds, then slowly lower back down
Common Mistakes:
1. Pushing up entirely with the arms (this compresses the lower back)
2. Lifting too high too soon
3. Holding the breath
Beginner Modification:
Only lift as high as your back muscles not your arms can take you. Even a few inches off the mat is effective.
Safety Tip:
Avoid this pose: if you have a herniated disc, especially with symptoms that radiate down the leg. Always confirm with a healthcare provider.
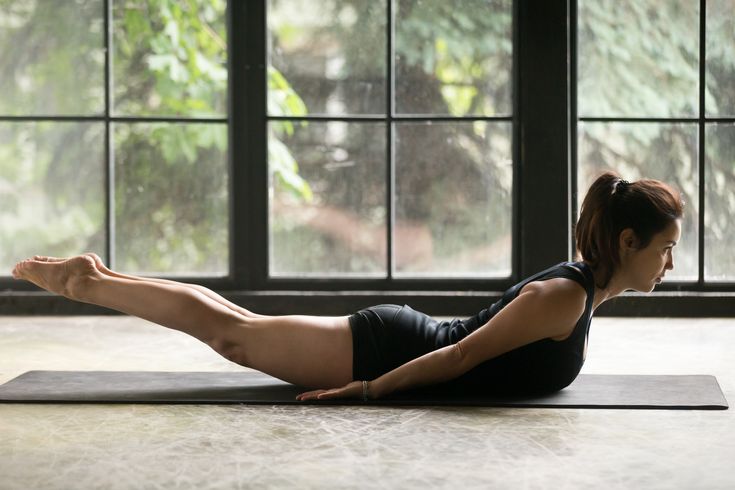
6. Locust Pose
(Salabhasana)
Best for:
- Posterior chain strength
- lower back muscle building
- posture
Locust Pose is one of the best-kept secrets in back pain yoga. While most people focus on stretching, the real solution for many back problems is strengthening the muscles that hold the spine upright. Locust does exactly that.
Benefits:
- Builds significant strength in the lower back, glutes, and hamstrings
- Improves posture by strengthening the posterior chain
- Reduces the risk of recurring back pain through muscular support
- Counteracts weakness caused by sedentary lifestyle
Muscles Worked:
Erector spinae, glutes maximus, hamstrings, posterior deltoids, and rhomboids
How to Perform It:
1. Lie face down: with arms alongside your body, palms facing down
2. Place your forehead: gently on the mat
3. Inhale and lift your: head, chest, arms, and legs off the floor simultaneously
4. Squeeze your glutes: and reach your arms back toward your feet
5. Hold for 10–20 seconds, breathing steadily
6. Lower down slowly and rest before repeating
Common Mistakes:
1. Holding the breath (creates excessive spinal compression)
2. Lifting the legs but not the upper body, or vice versa
3. Straining the neck by looking too far up
Beginner Modification:
Lift only your chest and arms, keeping your legs on the floor. Or alternate — first lift just the legs, then just the upper body in separate repetitions.
Safety Tip:
This pose is not suitable for people in the acute (intense, flare-up) phase of back pain. Wait until pain has reduced to mild before attempting it.
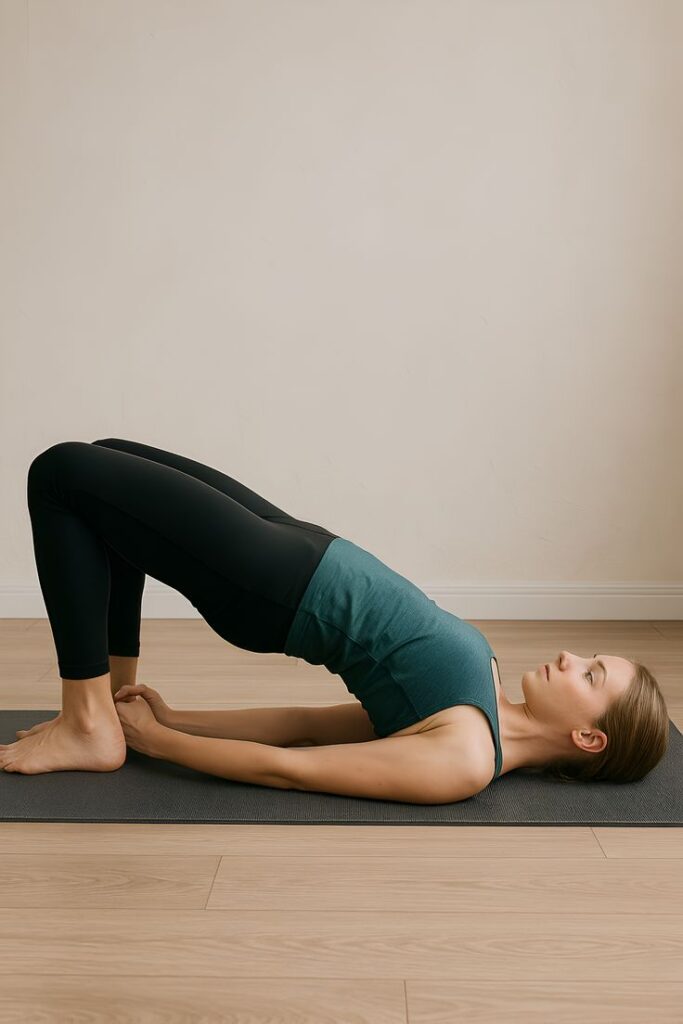
7. Bridge Pose
(Setu Bandha Sarvangasana)
Best for:
- Glute activation
- pelvic alignment
- lower back and core strength
Bridge Pose is one of the most therapeutically powerful poses for lower back pain. It directly targets the glutes — muscles that are often severely weakened by sitting — which are critical for taking pressure off the lumbar spine.
Benefits:
- Activates and strengthens the glutes, which support the lower back
- Strengthens the hamstrings and core simultaneously
- Stretches the hip flexors and thighs
- Improves pelvic alignment and reduces anterior pelvic tilt
Muscles Worked:
Gluteus maximus, hamstrings, erector spinae, transverse abdominis, and hip flexors (stretch)
How to Perform It:
1. Lie on your back: with knees bent, feet flat on the mat, hip-width apart
2. Place your arms: alongside your body, palms down
3. Press your feet: firmly into the mat and inhale as you lift your hips toward the ceiling
4. Squeeze your glutes: at the top and hold for 5–8 breaths
5. Exhale and lower your spine back down slowly, one vertebra at a time
Common Mistakes:
1. Letting the knees fall open (keep them aligned with your hips and feet)
2. Thrusting up with momentum rather than pressing mindfully
3. Forgetting to engage the core and protect the lower back
Beginner Modification:
Place a yoga block between your thighs to maintain knee alignment. Or place a block under your sacrum for a supported, passive version called Supported Bridge.
Safety Tip:
If you feel discomfort in the lower back during this pose, reduce your height or check that your feet aren’t too far from or close to your hips.
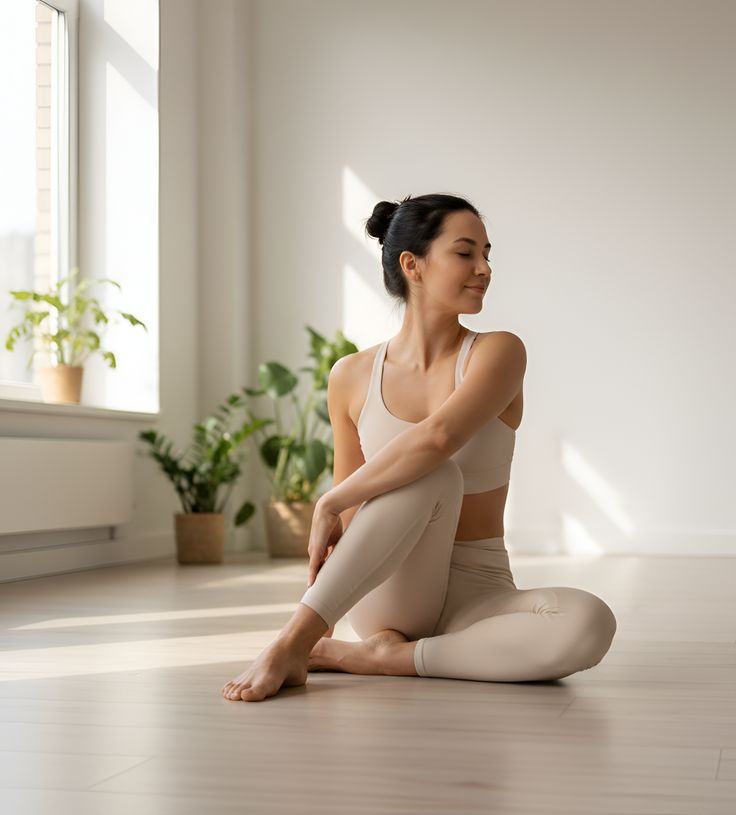
8. Half Lord of the Fishes Pose
(Ardha Matsyendrasana)
Best for:
- Spinal rotation
- Shoulder and hip tightness
- Seated stiffness
This classic seated spinal twist is one of the most effective poses for restoring healthy rotation to the spine — a movement that almost everyone loses when they sit all day. It also massages the internal organs and improves circulation through the spinal discs.
Benefits:
- Improves spinal rotation and lateral flexibility
- Stretches the shoulders, hips, chest, and outer thighs
- Relieves stiffness from prolonged sitting or inactivity
- Helps hydrate and mobilize spinal discs
Muscles Worked:
Spinal rotators (multifidus, rotatores), obliques, piriformis, IT band, and shoulder external rotators
How to Perform It:
1. Sit on your mat: with both legs extended
2. Bend your: right knee and cross your right foot over the left leg, planting it outside the left knee
3. Keep the left leg: extended or bend it — whatever is most comfortable
4. Sit up tall: and inhale to lengthen your spine
5. Exhale and twist: to the right, placing your right hand on the floor behind you and your left elbow or arm on the outside of your right hand on the floor behind you and your left elbow or arm on the outside of your right knee Look over your right shoulder
6. Hold for 5–8 breaths, then repeat on the other side
Common Mistakes:
1. Rounding the lower back instead of sitting tall
2. Forcing the twist too aggressively
3. Holding the breath at the deepest point
Beginner Modification:
Sit on a folded blanket to elevate your hips slightly. This makes it much easier to maintain a tall spine during the twist.
Safety Tip:
People with disc herniations should approach twisting poses cautiously and consult a physical therapist before practicing them.
9. Two-Knee Spinal Twist
(Supta Matsyendrasana)
Best for:
- Recovery
- gentle lower back release
- stress and tension relief
This gentle, floor-based twist is one of the most relaxing poses in all of yoga. It requires almost no effort, making it perfect for evenings, rest days, or any time your back feels tight and achy.
Benefits:
- Gently releases tension in the lower back and hips
- Improves mobility in the thoracic (mid) spine
- Encourages parasympathetic (rest and digest) nervous system activation
- Works as an excellent cool-down or recovery pose
Muscles Worked:
Spinal rotators, quadratus lumborum (QL), gluteus medius, piriformis, and thoracic extensors
How to Perform It:
1. Lie on your back: with both knees bent and feet flat on the mat
2. Extend your arms: out to the sides in a T-shape
3. Inhale and on the exhale: let both knees slowly fall to the right gently look over your left shoulder
4. Breathe deeply: and relax completely into the pose
5. Hold for 1–3 minutes, then slowly bring the knees back to center and switch sides
Common Mistakes:
1. Lifting the opposite shoulder off the ground
2. Forcing the knees all the way to the floor
3. Moving in and out of the pose too quickly
Beginner Modification:
Place a folded blanket or bolster under your knees on both sides so your legs have a resting point that doesn’t strain the lower back.
Safety Tip:
If you feel pain (not just a stretch) in your lower back or hips during this pose, place more support under your knees to reduce the range of motion.
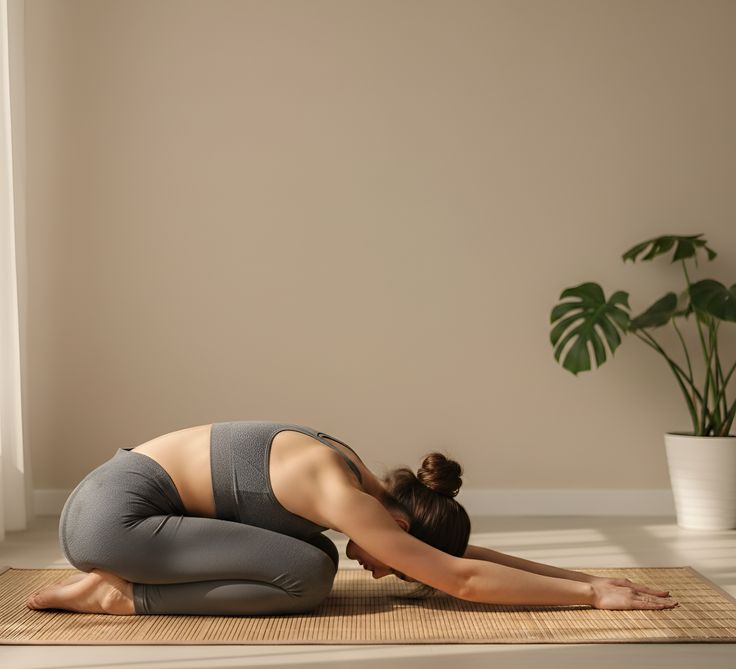
10. Child’s Pose
(Balasana)
Best for:
- Rest
- lower back release
- decompression
- stress relief
Child’s Pose is the ultimate reset button. It’s the pose you come back to anytime a session feels like too much. It passively lengthens the entire spine, relaxes the hips, and signals the nervous system to calm down — making it ideal as a resting pose, cool-down, or standalone stress reliever.
Benefits:
1. Decompresses the lumbar spine gently and passively
2. Stretches the hips, thighs, and ankles
3. Calms the nervous system and reduces mental stress
4. Allows the back muscles to fully relax without effort
Muscles Worked:
Erector spinae (passive lengthening), glutes, hip rotators, and ankle flexors
How to Perform It:
1. Kneel on your mat: with big toes touching and knees wide apart
2. Sit your: hips back toward your heels
3. Walk your hands: forward and lower your forehead to the mat
4. Extend your arms: forward (Active Child’s Pose) or rest them by your sides (Passive)
5. Breathe slowly and deeply, feeling your back expand with each inhale.
6. Stay for 1–5 minutes.
Common Mistakes:
1. Forcing the hips all the way to the heels when they don’t reach
2. Holding tension in the shoulders or neck instead of fully releasing
Beginner Modification:
Place a folded blanket between your thighs and calves if your hips don’t easily reach your heels. Place a pillow under your chest if you want extra support.
Safety Tip:
If you have knee pain, place a folded blanket behind your knees to reduce compression. People with severe knee injuries should skip this pose and substitute with a gentle supine hamstring stretch instead.
Yoga Poses to Avoid with Severe Back Pain
Not every yoga pose is helpful — and some can make things significantly worse if you have a vulnerable back. Avoid these movements unless a doctor or physical therapist has specifically cleared you:
Full Wheel / Backbend: Excessive lumbar compression
Seated Forward Fold with rounded back: Loads spinal discs in a vulnerable position
Headstand or Shoulder Stand: Extreme cervical (neck) compression
Deep twists with force: Can aggravate disc herniations
High-impact transitions (jump-throughs): Spinal jarring and impact
Intense hamstring stretches: Can worsen sciatica
Unsupported forward bends: Increased disc pressure
Rule of Thumb:
If a pose causes sharp pain, numbness, tingling, or makes symptoms travel further down your legs — stop immediately and consult a healthcare provider.
Common Mistakes Beginners Make
Even well-meaning beginners can accidentally make their back pain worse. Here are the most common pitfalls to watch for:
1. Pushing through pain: Mild discomfort is okay. Sharp pain is your body asking you to stop.
2. Skipping the warm-up: Cold muscles are far more likely to strain during stretching.
3. Copying advanced poses: without modifications — Use every modification available. There’s zero shame in it.
4. Holding the breath: Breath-holding increases tension. Breathe slowly through every movement.
5. Practicing only when pain flares up: Consistency prevents flare-ups. Practice on good days too.
6. Ignoring alignment: One session with a qualified yoga instructor can save you months of bad habits.
7. Doing too much too soon: Start with 15–20 minutes, three times a week. Build from there.
Best Time to Practice Yoga for Back Pain
There’s no single “perfect” time — but here are some guidelines:
Morning:
Great for reducing overnight stiffness. Keep the intensity gentle since muscles are cold.
Lunchtime:
A mid-day break helps counteract hours of sitting and re-energizes your afternoon.
Evening:
Restorative poses like Child’s Pose and Two-Knee Twist help wind down the day and prepare for sleep.
Pro Tip:
For lower back pain specifically, gentle morning movement (Cat-Cow, Child’s Pose) is often the most effective time to practice. Overnight, spinal discs rehydrate and can feel more sensitive — moving gently helps them settle in.
What Science Says About Yoga and Back Pain
This isn’t just anecdotal. Research consistently supports yoga as an effective approach for managing chronic back pain.
Key Findings from Research:
A landmark study published in Annals of Internal Medicine found that yoga was as effective as physical therapy for treating chronic low back pain in adults.
A systematic review of 12 randomized controlled trials found that Yoga significantly reduced pain intensity and improved back-related function compared to non-exercise controls.
Research from Jama international found that yoga participants reported less reliance on pain medication after 12 weeks of practice.
Studies suggest yoga’s combination of: strengthening, stretching, and stress reduction creates benefits that medication alone cannot replicate.
What the Evidence Supports Most Strongly:
- Reducing chronic (ongoing) lower back pain
- Improving physical function and range of motion
- Decreasing reliance on pain medication
- Improving mood and quality of life for back pain sufferers
Important Note:
Most research focuses on gentle, consistent practice rather than advanced or intense yoga. The beginner-friendly poses in this guide align with what has the most evidence behind it.

When to See a Doctor
Yoga is powerful; but it isn’t a replacement for medical care in every situation.
See a Doctor or Physical Therapist If You Have:
- Back pain that came on suddenly after an injury or fall
- Pain that radiates down one or both legs below the knee
- Numbness, tingling, or weakness in your legs or feet
- Loss of bladder or bowel control (seek emergency care immediately)
- Back pain accompanied by fever, unexplained weight loss, or fatigue
- Pain that is constant, severe, and does not improve with rest
- A diagnosis of spinal stenosis, herniated disc, osteoporosis, or cancer history
A proper diagnosis ensures you choose the right type of movement — and helps you avoid poses that could make your specific condition worse.
Frequently Asked Questions
1. What type of yoga is best for back pain?
The best types of yoga for back pain are gentle, slow-paced styles that focus on stretching and strengthening the spine:
Hatha Yoga – Best for beginners with gentle poses.
Iyengar Yoga – Uses props (blocks, straps, blankets) for proper alignment and is excellent for people with back pain.
Restorative Yoga – Promotes relaxation and reduces muscle tension.
Gentle Vinyasa – Suitable only if pain is mild and movements are controlled.
2. What are the big 3 exercises for back pain?
The “Big 3” exercises, developed by spine expert Stuart McGill, are:
1. Modified Curl-Up: Strengthens the core while protecting the spine.
2. Side Plank: Builds strength in the side core muscles and improves spinal stability.
3. Bird Dog: Strengthens the back, glutes, and core while improving balance.
3. Which yoga is best for osteoporosis?
For people with osteoporosis, the safest choices are:
Iyengar Yoga – Best because it emphasizes correct posture and alignment.
Gentle Hatha Yoga – Helps improve balance, flexibility, and muscle strength.
Chair Yoga – A safe option for older adults or those at high risk of falls.
Avoid deep forward bends and twisting poses if you have osteoporosis, unless guided by a qualified instructor.
4. What yoga poses should be avoided with lower back pain?
If you have lower back pain, avoid or modify these poses, especially during a flare-up:
- Deep Forward Fold (Standing Forward Bend)
- Full Wheel Pose
- Camel Pose (if painful)
- Full Boat Pose
- Deep Twists
- Full Cobra or Upward-Facing Dog (if they increase pain)
- Headstand and Shoulder Stand (unless experienced and supervised.
Instead, try gentle poses such as:
- Cat-Cow Pose
- Child’s Pose
- Sphinx Pose
- Bridge Pose
- Bird Dog
- Downward-Facing Dog (only if comfortable)
5. What’s the difference between Cobra Pose and Sphinx Pose?
Sphinx is gentler — you rest on your forearms, creating a modest backbend that’s ideal for beginners or sensitive backs. Cobra uses the arms more actively and creates a deeper extension. Start with Sphinx and progress to Cobra when you’re ready.
6. Which yoga pose is best for immediate back pain relief?
Child’s Pose and the Two-Knee Spinal Twist are the best options for immediate relief — they’re passive, gentle, and help the back muscles release quickly. Cat-Cow is also excellent for loosening up stiffness within minutes.
7. Can beginners do these poses safely?
Yes. All 10 poses in this guide are beginner-friendly and include modifications. Start slowly, use props when needed, and never push through pain. If you’re unsure, consider one session with a certified yoga instructor to learn the basics.
8. How long does it take for yoga to help back pain?
Many people notice reduced stiffness after just 2–4 sessions. More significant improvements in strength, flexibility, and posture typically develop over 4–8 weeks of consistent practice. Results depend on your starting fitness level and the cause of your pain.
Final Thoughts
Back pain doesn’t have to be a permanent part of your life.
The 10 yoga poses in this guide — from Cat-Cow to Child’s Pose — give you a practical, evidence-based toolkit for reducing pain, building strength, and protecting your spine. They don’t require flexibility, gym equipment, or prior experience. They just require consistency and a willingness to listen to your body.
Here’s the most important thing to remember:
yoga works best when practiced regularly, not intensely. Three gentle sessions per week will serve you far better than one aggressive workout. Small, consistent improvements add up to life-changing results over time.
Start simple. Try (Cat-Cow and Child’s Pose)today. See how your back feels tomorrow morning. Then build from there.
If your pain continues after several weeks of regular practice — or if it worsens at any point — please consult a qualified healthcare provider. Combining expert medical guidance with smart yoga practice is the most effective path to a stronger, pain-free back.
Your spine has carried you this far. Now it’s your turn to take care of it.
How to Debloat in 7 Days Naturally — The Complete Beginner Guide That Actually Works
7-Day No-Sugar Mediterranean Diet Meal Plan for Weight Loss, Created by a Dietitian.